Embedding Canvas Envision Creator and evCreate API Calls Into HTML
You can embed the front end of the Canvas Envision Creator web app and your JS code that calls the app's functionality with the evCreate API functions into custom web pages.
Prerequisites for embedding Canvas Envision Creator into HTML
The Canvas Envision Creator is a web application with front and back ends. Each end has its own codebase. The front end embedded in a custom HTML page requires its codebase to be on the same drive as the HTML page. Without the front-end codebase, the embedded web app and custom scripts will not work.
You can download the front-end codebase to your local environment as discussed in the following section: Downloading and Running Front-end Codebase Locally.
Additionally, a web server app should host the custom HTML page.
Embedding Canvas Envision Creator into HTML
To embed the front end of the Canvas Envision Creator web application into a custom web page, you should do the following:
Add the elements necessary for the front end to your custom HTML file according to the HTML template for Canvas Envision Creator.
If necessary, set the custom attributes of the
ev-creatortag for the deployed app instance.If necessary, configure the size, position, and other standard HTML and CSS attributes for the
ev-creatorelement on the web page.If there is a connection or download latency, use the
waitForEvCreateApiReady()asynchronous function to wait for the evCreate API to be ready for calls.
HTML template for Canvas Envision Creator
To integrate the front end of the Canvas Envision Creator web app into a web page, you should add the HTML elements with the app instance data to the HTML file of that page according to the following template:
HTML elements for Canvas Envision Creator
The embedded front end of the Canvas Envision Creator web app requires some elements nested in the <head> and <body> sections of an HTML document. Along with the required elements, you can use your custom elements constructed with the standard HTML tags as you need.
Required elements in <head>
The <head> section should include the following child elements:
<base>with a single slash to construct correct relative paths to 3D parts:
<script>with a path to the 3dconnexion.min.js file in the front end's assets library necessary to support manipulating 3D models and parts with a SpaceMouse® 3D mouse by 3Dconnexion:
Required elements in <body>
The <body> section should include the following child elements:
<ev-creator>that represents the embedded front end of the Canvas Envision Creator web app. The front-end codebase resolves the<ev-creator>element and runs the application on the web page. Without the front-end codebase,<ev-creator>will raise an error because it is not a standard HTML tag. The<ev-creator>tag:
<script>with a path to the polyfills.js file in the front-end codebase library necessary to support old browser versions.
<script>with a path to the main.js file in the front-end codebase library, which is the entry point for executing the app's front-end code.
Custom <ev-creator> tag attributes
The <ev-creator> HTML tag provides custom attributes to configure the embedded front end of the Canvas Envision Creator web app. All such custom attributes are optional. The tag can have no, one, or more than one of its custom attributes. If a custom attribute is not given, the front end will automatically use its configuration provided in the codebase.
The custom attributes of the <ev-creator> tag are the following:
workspaceA number or string identifying a workspace in the Canvas Envision Portal cloud solution that stores evdoc files. It can be either:
A static ID generated during the Envision account setup, e.g.,
workspace='165'.A slug to sign into the workspace, e.g.,
workspace='abc_company'.
It is recommended to use slugs instead of IDs because slugs are more user-friendly. You can easily find and read slugs in the system.
If the
workspaceattribute is not given, the system will ask a user to enter the name of a workspace when the user signs into the embedded Canvas Envision Creator web app. If it is given, this step is omitted, and the user is asked to sign into the given workspace.
centerA number or string identifying a work center in a given workspace in the Canvas Envision Portal cloud solution. It is a static ID generated during the work center creation, e.g.,
center='165',center='work', etc.idA path to an evdoc file relative to a given work center in the Canvas Envision Portal cloud solution, e.g.,
id='/MyFolder/MyDoc.evdoc'.wasm_pathA path to a location from where the Canvas Envision Creator assets should be loaded. It can be an absolute URL to the assets folder.
env_web_viewer_urlA URL to a Canvas Envision Creator server. By default, it is set to the Canvas Envision SaaS server. You should provide a custom URL for a self-hosted Canvas Envision Creator instance, e.g.,
env_web_viewer_url='https://app.canvasenvision.com'env_apiA URL to the API endpoint of a Canvas Envision Creator server. By default, it is set to the Canvas Envision SaaS server's API endpoint. You should provide a custom URL for a self-hosted Canvas Envision Creator instance, e.g.,
env_api='https://api.canvasenvision.com'env_wsA URL to the WebSockets endpoint of a Canvas Envision Creator server. By default, it is set to the Canvas Envision SaaS server's WebSockets endpoint. You should provide a custom URL for a self-hosted Canvas Envision Creator instance, e.g.,
env_ws='wss://api.canvasenvision.com'
Managing the <ev-creator> element on the web page
There are two ways to manage the layout of the embedded front end of the Canvas Envision Creator web app:
With the help of a parent container.
Directly in the
<ev-creator>tag.
As the <ev-creator> tag is custom, it is highly recommended to put it into a parent container element, usually <div>, and set the standard HTML and CSS attributes in the container element tag for applying standard HTML and CSS features to the embedded front-end app. It is the most flexible way to control the front-end app layout on the page. For example, to make the embedded front-end app occupy 50% of the screen, the <ev-creator> element should be inside a <div> container, whose style attribute should be set to 'height:50vh; width:50vw'.
The second way is to set the standard HTML and CSS attributes right in the <ev-creator> tag without placing it into a standard container element. This approach is not recommended and should be avoided because it directly modifies the styles of the embedded front-end app.
waitForEvCreateApiReady() function
The waitForEvCreateApiReady() asynchronous function ensures that the custom code calls the evCreate API when the API is available.
To use the waitForEvCreateApiReady() function, call it before calling the evCreate API functions.
The waitForEvCreateApiReady() function is optional: you may choose not to use it when you are confident that the API is ready before the calls. For example, you may call it once on the front-end application startup or reloading and then skip it before calling the API functions.
You can declare and call the waitForEvCreateApiReady() function as a JS script placed in the HTML document or as a function in .js files.
Including scripts with evCreate API calls
You can embed custom JS code that calls the evCreate API into the HTML document with the standard <script> HTML element following the conventional practices and rules for JS and this element. The code can be nested in this element or attached to it in external .js files or modules. The custom <script> element should be placed in the <body> section after the <ev-creator> element and required <script> elements with the polyfills.js and main.js modules.
The code calling evCreate API functions will not work without the front-end codebase in the given environment.
Example of the embedded Canvas Envision Creator and custom script
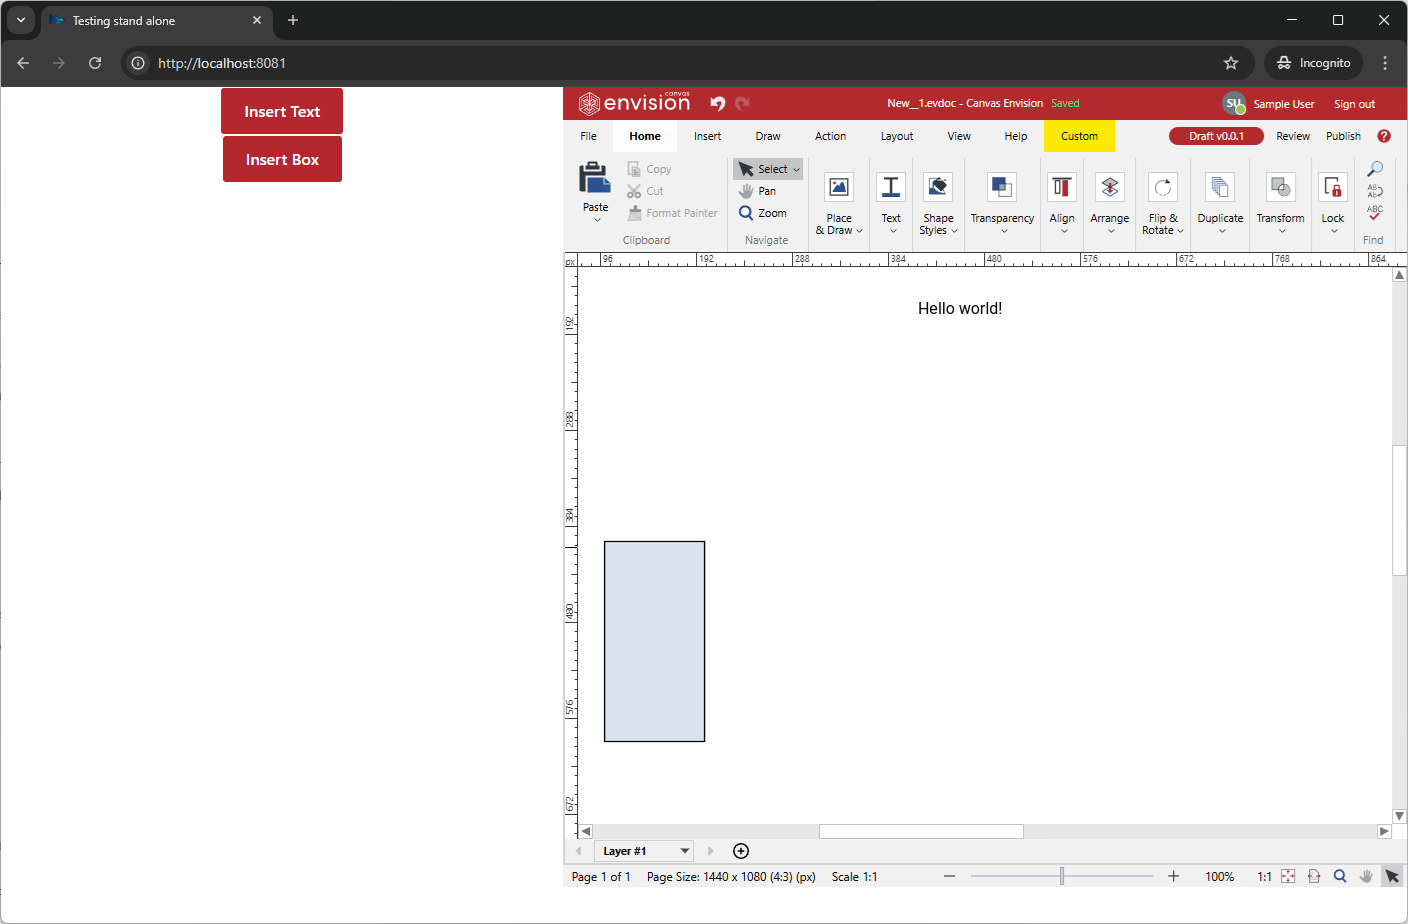
The image below displays an example of a front-end Canvas Envision Creator app embedded in a custom web page. The front-end app occupies the page partially. The page has two custom buttons outside the embedded app. The buttons insert objects into a given Envision document page as follows:
Insert Text: a text object with the following phrase: Hello world!
Insert Box: a rectangular shape object.

Below is the source code for the discussed example.