Managing Custom Ribbon Tab and Buttons
If your Canvas Envision account has Admin privileges, you can create one custom tab on the ribbon of the Canvas Envision Creator web application. The custom tab appears after the Help tab before a contextual tab on the ribbon of the document page editor and after the View tab in the 3D editor. It must have at least one custom command button with custom JS code executed when clicking this button. When deployed, the button is visible on the ribbon tab to all the Creators and Admins in your workspace. To manage the custom ribbon tab and buttons, you need to learn its architecture and mechanism first.

Custom button prerequisites
To create a custom command button, you need the following:
Admin team membership for the Canvas Envision Creator.
An icon that the button will display.
A JS script that the button will run.
Button icon requirements
A command button icon should meet the following requirements:
Type: SVG or PNG
Size: 32x32 pixels
SVG is recommended because PNG is automatically converted into SVG on command button creation, and the results of automatic conversion may differ from what you expect.
Images smaller or larger than the recommended size are automatically scaled up or down. Scaled icons, especially converted from PNG files, may be distorted or may not have the desired level or clarity of details.
Button script requirements
A command button script should be valid and self-sufficient.
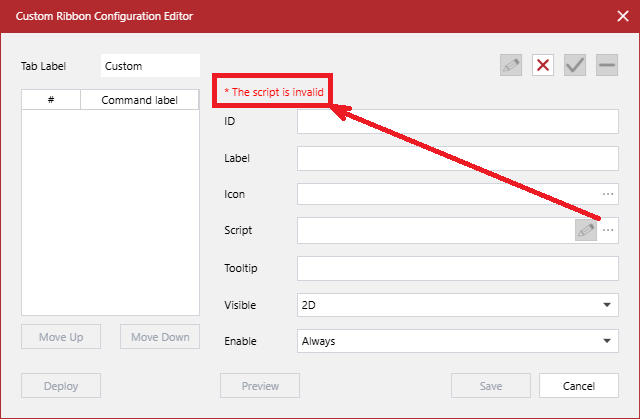
The button script should be a .js file with JS code valid for execution in the JS runtime environment. The application verifies the file on uploading and raises an error message in the Custom Ribbon Configuration Editor pop-up dialog box if the code is invalid. In such a case, you should investigate the file in the IDE against bugs, errors, and warnings and correct the issues. For example, global await expression statements are valid in the console but invalid in the runtime environment, where they should be embedded in async functions.
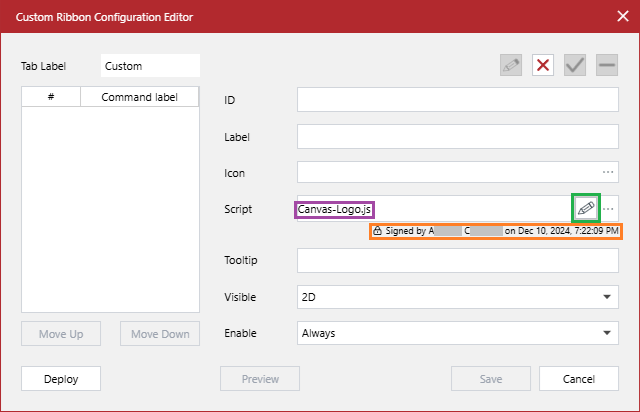
If the code is valid, the Script field of the Custom Ribbon Configuration Editor dialog displays the name of the .js file. Also, a message with your script signature appears under the field. And, the Edit button becomes active in the field.
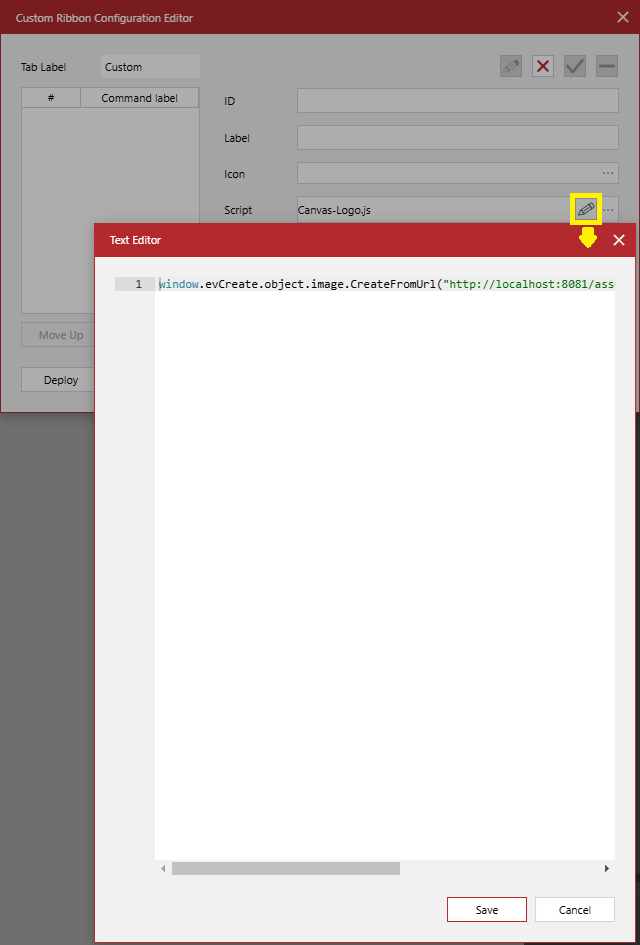
Clicking the Edit button in the Script field shows the Text Editor pop-up dialog box with the script code. You can review and edit the code if necessary.
The button script should also contain everything it needs because it runs in the JS evaluation context. If the script has external dependencies or should download external resources, such as images, multimedia, 3D models, and so on, it should be able to access these external dependencies and resources via URL. They can be stored in a dedicated folder, like assets, on the server running the application. If they are on a remote location or service, the script should have access to that location or service.
Custom Ribbon Configuration Editor
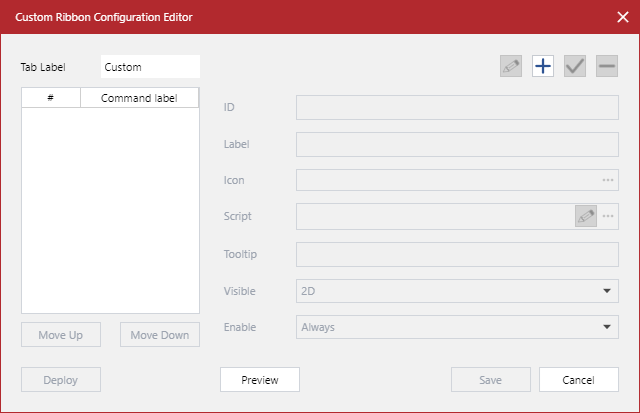
You create, update, and delete the custom ribbon tab and command buttons on it with the Custom Ribbon Configuration Editor pop-up dialog box.
Accessing the Custom Ribbon Configuration Editor dialog
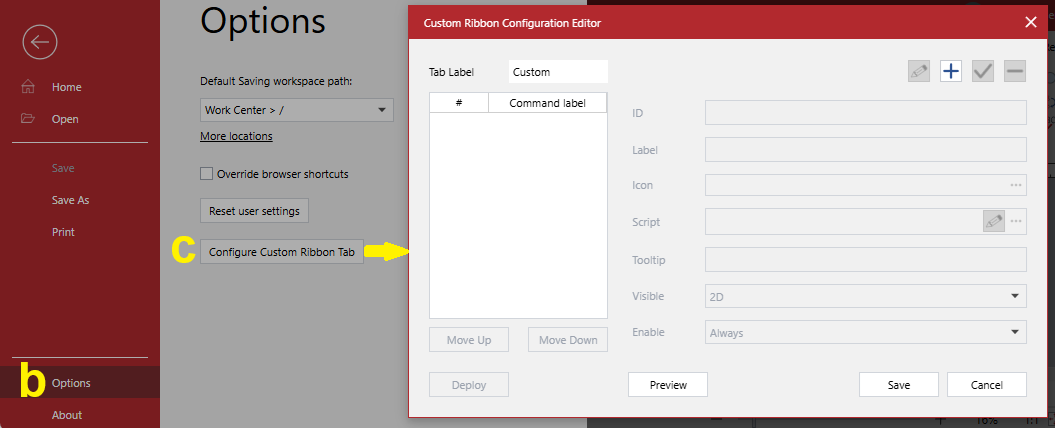
To show the Custom Ribbon Configuration Editor pop-up dialog box:
Create or open an Envision document in the Canvas Envision Creator web app.
Click .
UI of the Custom Ribbon Configuration Editor dialog
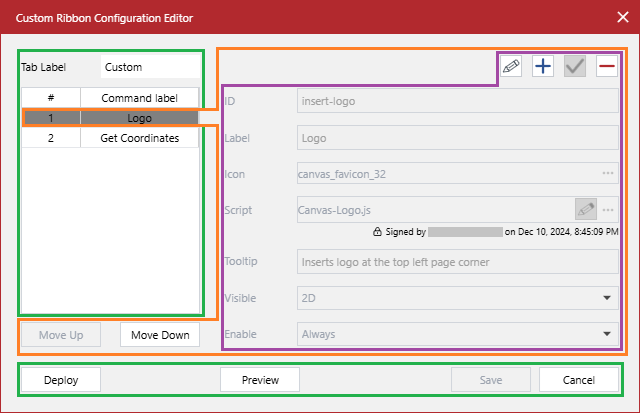
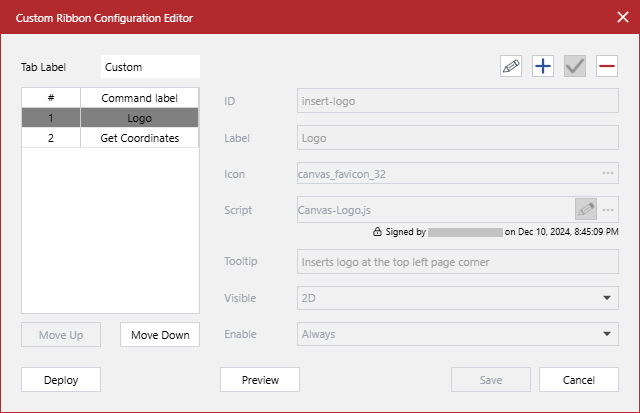
The Custom Ribbon Configuration Editor pop-up dialog box includes UI elements for managing the custom ribbon tab and a given custom command button.
UI for the custom ribbon tab
To manage the custom ribbon tab, the Custom Ribbon Configuration Editor pop-up dialog box has the following:
- Tab Label
A string field that defines the name of the custom tab shown on the ribbon. Its default value is Custom.
- Commands
A list of the custom command buttons on the custom ribbon tab. It is located on the left side of the dialog below the Tab Label field.
The list is empty by default on Canvas Envision Creator deployment. Once a new custom command button is created, it is displayed on the list.
The buttons are listed from top to bottom in the order they appear on the tab from left to right. You can rearrange the buttons on the tab with the Move Up and Move Down buttons located below the list.
When you select a custom command button from the list:
The fields on the right side of the dialog display the properties of this command button.
The Edit and Delete buttons on the toolbar above the fields become active to edit or delete this command button.
The Move Up or Move Down button becomes active if you can move this command button in that direction.
- Deploy
A button to:
Move the custom ribbon tab definition from the
stagingconfiguration to thedeployedconfiguration. For details, see the Architecture and mechanism of the custom ribbon tab.Close the Custom Ribbon Configuration Editor dialog.
This button is active only if both:
The
stagingcustom ribbon tab configuration exists in the application database.There are no unsaved changes to the existing
stagingcustom ribbon tab configuration.
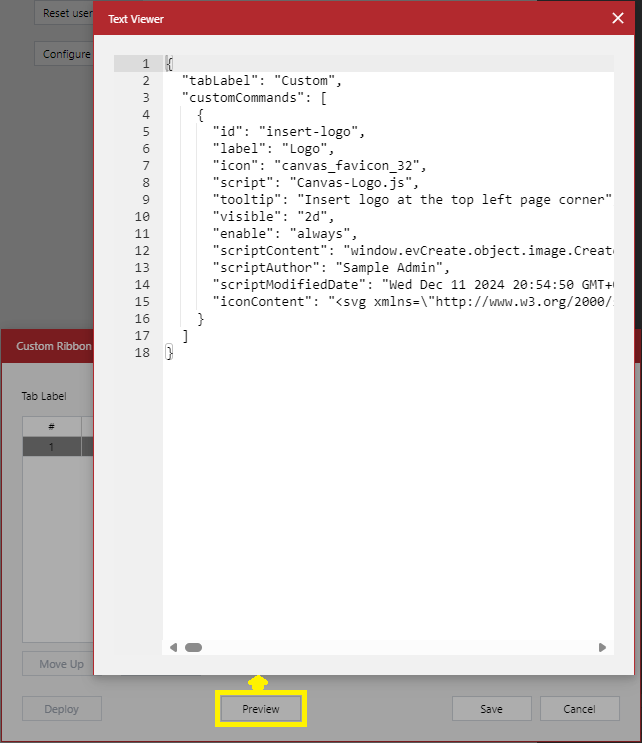
- Preview
A button to view the custom ribbon tab definition as JSON data in the Text Viewer pop-up dialog box.
- Save
A button to:
From your input in the Custom Ribbon Configuration Editor dialog, either:
Create the
stagingconfiguration of the custom ribbon tab in the application database if this configuration does not exist.Update the
stagingconfiguration of the custom ribbon tab existing in the application database.
Close the Custom Ribbon Configuration Editor dialog.
This button is inactive by default on opening the dialog box. It becomes active when you introduce at least one change to the tab or command button in the dialog.
For details on the
stagingconfiguration of the custom ribbon tab, see the Architecture and mechanism of the custom ribbon tab.- Cancel
A button to:
Dismiss unsaved changes to the custom ribbon tab or button. Your input in the Custom Ribbon Configuration Editor dialog will be lost.
Close the Custom Ribbon Configuration Editor dialog.
UI for custom command buttons
For the custom command button currently selected from the Commands list, the Custom Ribbon Configuration Editor pop-up dialog box features the following:
Buttons to reposition the given command button on the ribbon tab.
Fields to set, view, and edit the properties of the given command button.
A toolbar to manage the given command button and its properties.
Buttons for moving custom command buttons
Below the Commands list, there are the following buttons to reposition the selected custom command button:
- Move Up
To move the given command button to the left on the custom ribbon tab and up on the list. It is inactive for the first button on the list.
- Move Down
To move the given command button to the right on the custom ribbon tab and down on the list. It is inactive for the last button on the list.
Custom command button fields
On the right side of the Custom Ribbon Configuration Editor dialog, there are the fields that represent the properties of the custom command button currently selected from the Commands list. These fields are the following:
- ID
A string, the unique identifier of the given command button.
- Label
A string, the name of the given command button displayed on the ribbon tab.
- Icon
An .svg or .png file, the icon of the given command button displayed on the ribbon tab.
- Script
A .js file, the JS code executed by clicking the given command button.
- Tooltip
A string, the text displayed when hovering over the given command button on the ribbon tab.
- Visible
A drop-down list of mutually exclusive options where the given command button should be visible on the ribbon tab:
2D: only in the document page editor. It is the default value.
3D: only in the 3D editor.
- Enable
A drop-down list of mutually exclusive options when the given command button should be active on the ribbon tab:
Always: regardless of how many objects or parts are selected. It is the default value.
No selection: when no objects or parts are selected.
Single selection: when one object or part is selected.
Multi selection: when more than one object or part is selected.
Any selection: when one or more objects or parts are selected.
On opening the Custom Ribbon Configuration Editor dialog, these fields are blank because no command button is selected from the Commands list by default. When you select a custom command button from the list, the fields display the properties of this button but are inactive by default.
Toolbar for managing custom command buttons
To edit the properties of the selected command button, manage this command button, and create new command buttons, there is a toolbar above the fields.

The toolbar includes the following buttons:
- Edit

To enter editing the properties of a selected command button.
The Edit button becomes:
Active when you have selected a command button from the Commands list.
Inactive when either:
You are creating a new command button.
No existing command button is selected from the list.
On clicking this button:
The Reset button replaces it on the toolbar.
The Move Up, Move Down, Preview, Save, Add, and Delete buttons become inactive.
The Commands list becomes inactive.
The fields become editable.
- Reset

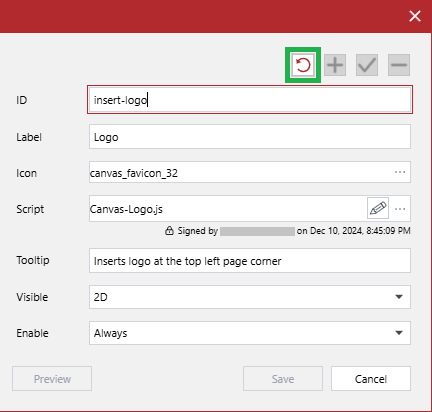
To quit editing the properties of a selected command button without saving the changes to these properties.
This button replaces the Edit button and is active when you are editing an existing command button.
On clicking this button:
The Edit button replaces it on the toolbar.
The Move Up, Move Down, Preview, Add, and Delete buttons become active.
The Confirm button becomes inactive if it has been active after doing some changes.
The Commands list becomes active.
The given command button continues to be selected from the Commands list.
The fields become inactive and display the values before editing. All your changes are lost.
- Add

To start creating a new custom command button.
This button is inactive when you are editing an existing command button.
On clicking this button:
The Dismiss button replaces it on the toolbar.
The Commands list becomes inactive.
No command button is selected from the Commands list.
The Move Up, Move Down, Preview, Save, Edit, and Delete buttons become inactive.
The string and file fields become editable and blank.
The fields with drop-down lists display the default values.
- Dismiss

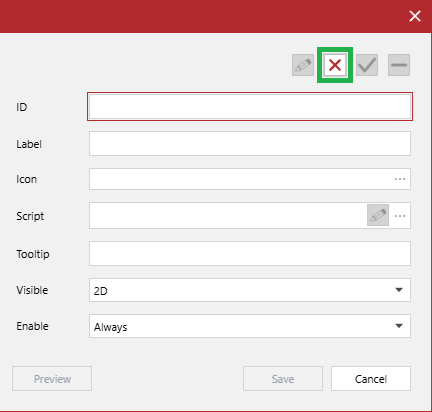
To quit creating a new custom command button without saving it.
This button replaces the Add button and is active when you are creating a new command button.
On clicking this button:
The Add button replaces it on the toolbar.
No command button is selected from the Commands list.
The Move Up, Move Down, Save, Edit, and Delete buttons continue to be inactive.
The Confirm button becomes inactive if it has been active after populating all the fields.
The Preview button becomes active.
The fields become inactive and blank. All your input is lost.
- Confirm

To prepare for saving to the
stagingcustom ribbon tab configuration either:Your changes to the properties of a selected existing command button when editing them.
A new command button that you have created.
For details on the
stagingconfiguration of the custom ribbon tab, see the Architecture and mechanism of the custom ribbon tab.This button becomes active if you have either:
Changed at least one value when editing the properties of a selected command button.
Populated all the properties with valid values when creating a new command button.
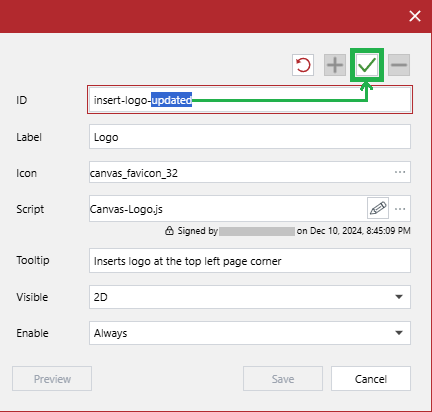
This button becomes inactive if you have clicked it, the Reset, or Dismiss button.
On clicking this button:
If editing an existing command button:
The Edit button replaces the Reset button.
Your changes to the custom command button properties are ready to be saved to the
stagingcustom ribbon tab configuration in the database.
If creating a new command button:
The Add button replaces the Dismiss button.
The newly created custom command button:
Appears at the bottom of the Commands list.
Is ready to be saved to the
stagingcustom ribbon tab configuration in the database.
The Commands list becomes active.
No command button is selected from the Commands list.
The fields become inactive and blank.
The Move Up, Move Down, and Delete buttons continue to be inactive.
The Deploy, Edit, and Confirm buttons become inactive.
The Preview, Save, and Add buttons become active.
- Delete

To either:
Delete a newly created command button unsaved to the database.
Prepare for deleting a command button existing in any configuration in the database from the
stagingcustom ribbon tab configuration in the database. For details on the custom ribbon tab configurations, see the Architecture and mechanism of the custom ribbon tab.
This button becomes:
Active when you have selected a command button from the Commands list.
Inactive when either:
You have clicked it.
You are editing an existing command button.
You are creating a new command button.
No existing command button is selected from the list.
On clicking this button:
The given command button is:
Removed from the Commands list.
Is ready to be deleted from the
stagingcustom ribbon tab configuration in the database if it exists in any custom ribbon tab configuration.
No command button is selected from the Commands list.
The fields become blank.
The Move Up, Move Down, Deploy, Edit, and Delete buttons become inactive.
The Save button becomes active.
Architecture and mechanism of the custom ribbon tab
To manage the custom ribbon tab and buttons on it, first of all, you must know and understand the following:
Its architectural design.
Its configurations.
The display of its configurations on the ribbon and in the Custom Ribbon Configuration Editor dialog.
The workflow for managing its configurations.
Once you are confident with the underlying concepts, you can create, update, delete, and deploy the custom ribbon tab and command buttons.
Custom ribbon tab architecture
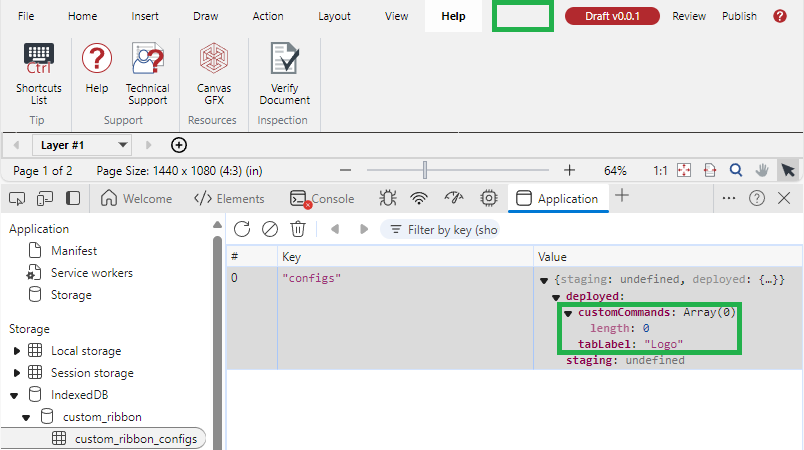
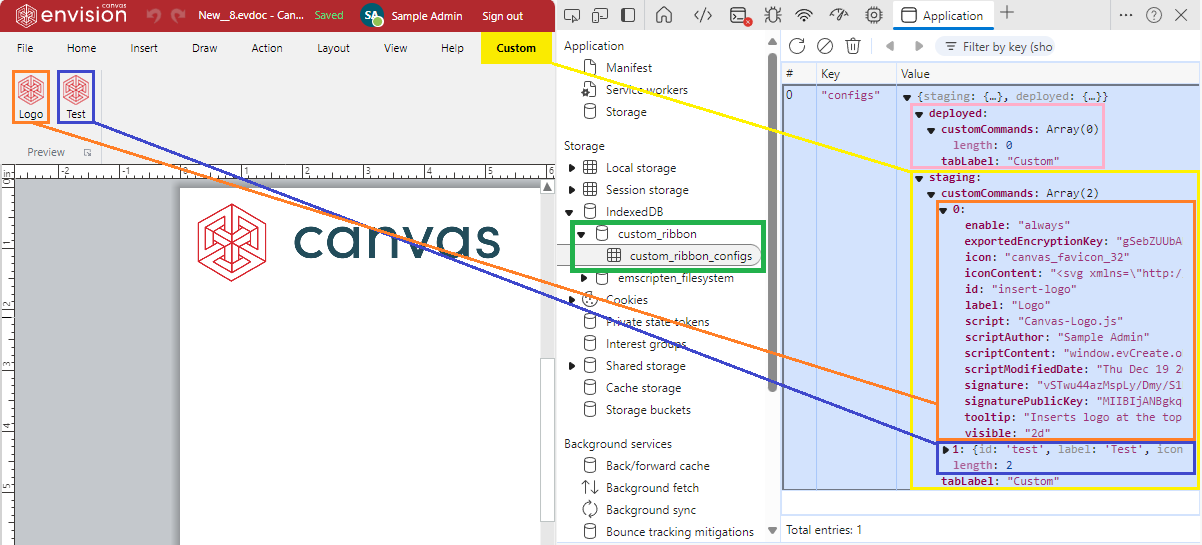
Technically, the definition of the custom ribbon tab is a data object with key-value pairs in JSON format stored along with the user settings in the internal section of the application database on the backend. On loading the Canvas Envision Creator app into the browser:
This data object is loaded into the
custom_ribbon_configstable of thecustom_ribbondatabase within theIndexedDBdata on the front end.The app's front end renders the custom ribbon tab and buttons in the GUI from the data stored in the
custom_ribbon_configstable.
Custom ribbon tab configurations
The custom_ribbon_configs table defines the configurations of the custom ribbon tab in the workspace. Each configuration represents an environment:
stagingThe staging environment for software and QA engineers to develop and test custom command buttons.
deployedThe production environment for all application users to use custom command buttons.
Custom tab configurations on the ribbon
The ribbon displays each configuration (environment) in a dedicated tab within the workspace as follows:
None: no custom tab is present on the ribbon.
staging: a custom tab with a yellow tab label background visible not only to you but also to all Admins.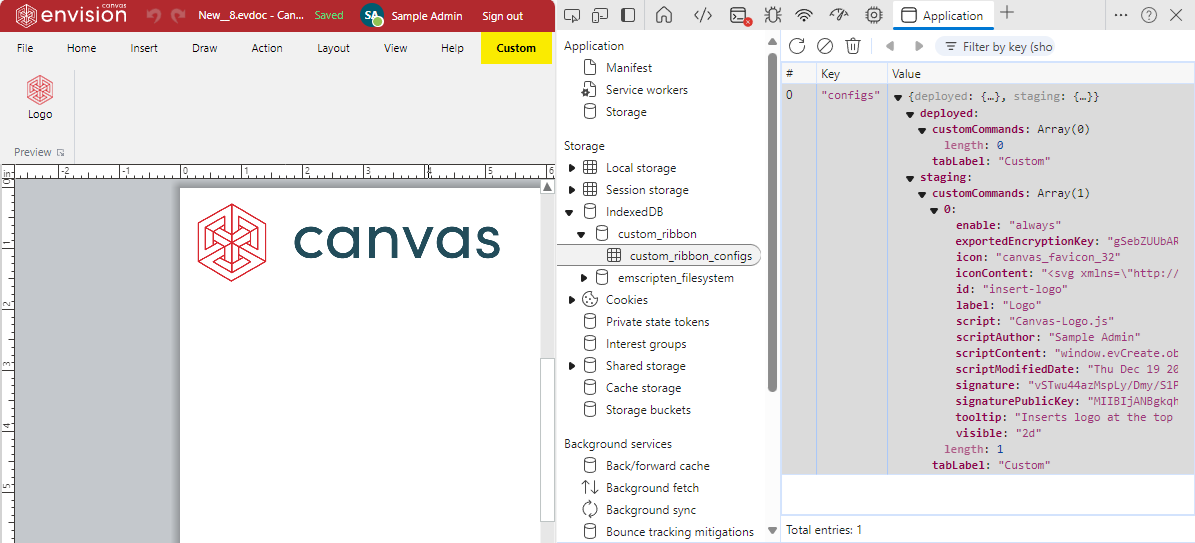
deployed: a custom tab with a regular tab label background visible to all Admins and Creators.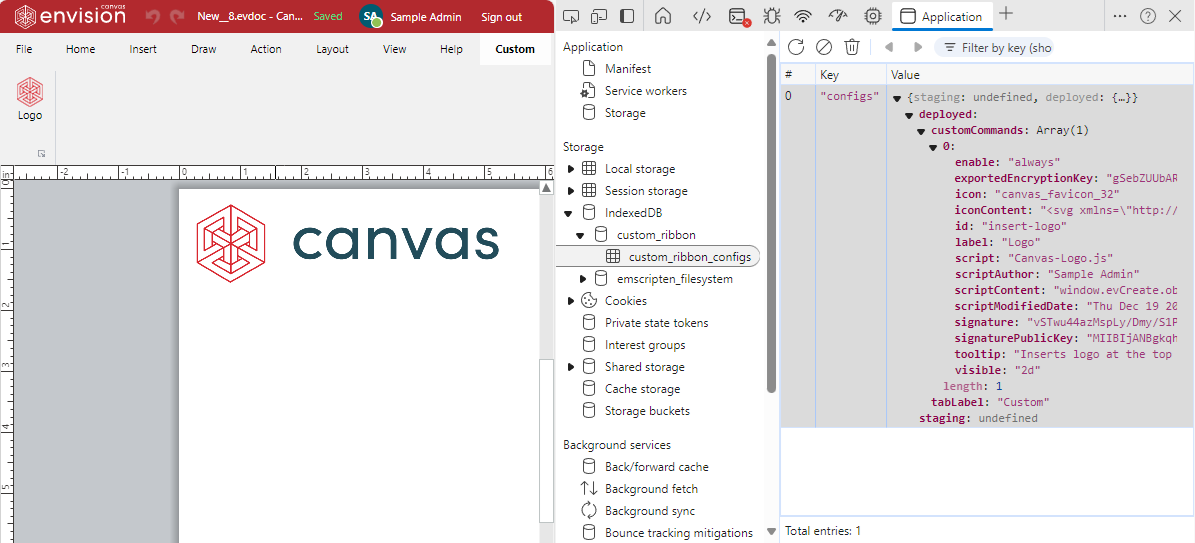
deployedandstaging: two custom tabs with regular and yellow tab label backgrounds. Admins can see both tabs, while Creators can see only thedeployedtab.
To be visible on the ribbon, the configuration should have at least one custom command button. The Visible property of the button defines where this button and the tab will be visible: in the 2D page editor or 3D scene editor. If one button should be visible at both places, the configuration should include two similar buttons with different Visible settings.
Custom tab configurations in the Custom Ribbon Configuration Editor dialog
The Custom Ribbon Configuration Editor dialog implicitly displays data and behaves as described below depending on:
Which configurations exist in the database.
Whether your input in the discussed dialog is saved to the database.
- No configuration + no unsaved data
The Tab Label field should be set to the default Custom value.
The Commands list is empty.
The Deploy button is inactive.
The Save button is inactive.
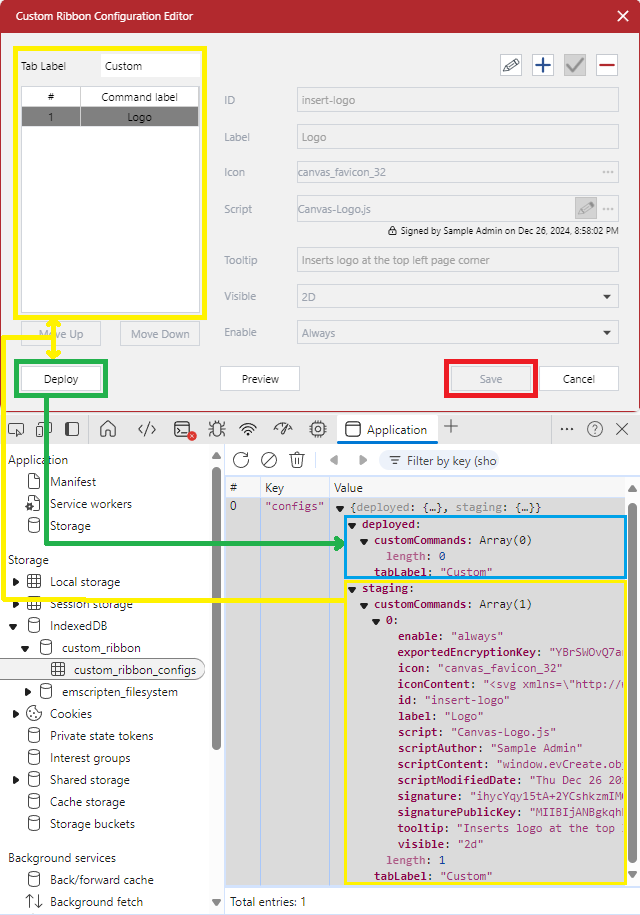
staging+ no unsaved dataThe Tab Label field displays the tab name shown in the
stagingconfiguration.The Commands list includes the custom command buttons saved in the
stagingconfiguration.The Deploy button is active to move the name set in the Tab Label field and custom command buttons given in the Commands list to the
deployedconfiguration.The Save button is inactive.
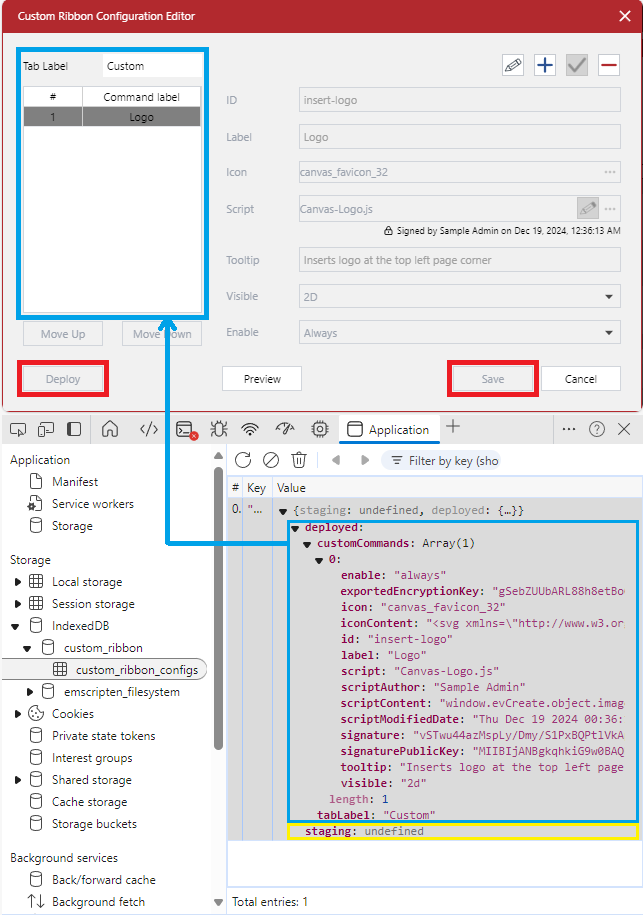
deployed+ no unsaved dataThe Tab Label field displays the tab name shown in the
deployedconfiguration.The Commands list includes the custom command buttons saved in the
deployedconfiguration.The Deploy button is inactive.
The Save button is inactive.
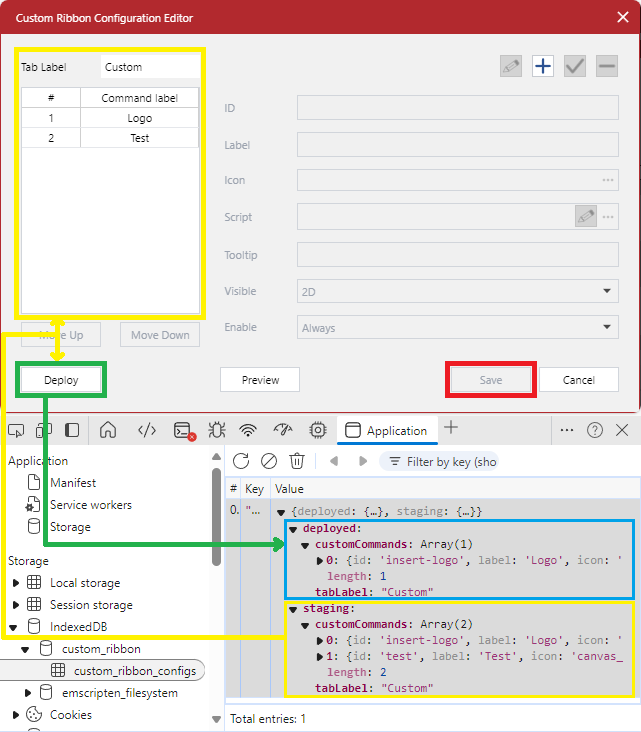
staging+deployed+ no unsaved dataThe Tab Label field displays the tab name shown in the
stagingconfiguration.The Commands list includes the custom command buttons saved in the
stagingconfiguration.The Deploy button is active to move the name set in the Tab Label field and custom command buttons given in the Commands list to the
deployedconfiguration.The Save button is inactive.
- Any configuration + unsaved data
The Tab Label field displays the tab name that will be saved to the
stagingconfiguration on clicking the Save button.The Commands list includes the custom command buttons that will be saved to the
stagingconfiguration on clicking the Save button.The Deploy button is inactive.
The Save button is active to save the name set in the Tab Label field and custom command buttons given in the Commands list to the
stagingconfiguration.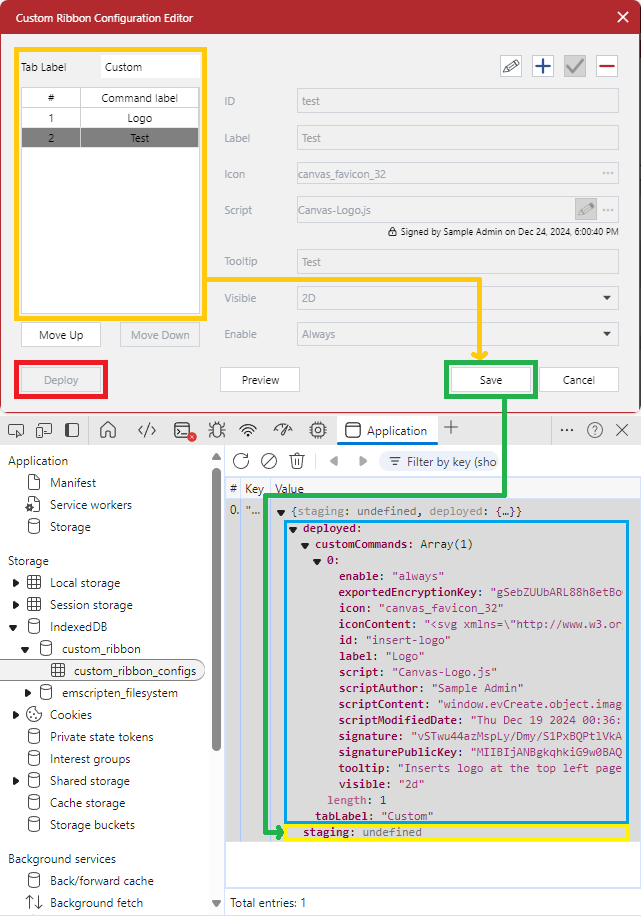
Workflow for managing the custom tab configurations
You always save any changes to the custom tab definition you have made in the Custom Ribbon Configuration Editor dialog to the staging configuration first and then move the tab definition with the saved changes from staging to deployed in another dialog session. Saving any changes to the deployed configuration directly is not allowed.
Thus, the workflow for managing the custom ribbon tab and command buttons on it is the following:
Create a button icon and script file and save them in a dedicated directory on your machine or the cloud.
Add the custom tab to the ribbon by creating a custom button and saving it to the
stagingconfiguration.Test the custom button in the
stagingconfiguration.If there are issues with the custom button, fix them and save the changes to the
stagingconfiguration.Once it is certain that the custom button works as expected, does not break anything, and does not introduce security risks, move the custom tab definition from
stagingtodeployedto let Creators in the workspace use the custom button.If it is necessary to update the
deployedconfiguration, such as to add a new button, update or remove an existing button, rename or delete the custom tab, save the current tab configuration in backup files, including the icons and scripts.Make the necessary changes to the custom tab and save them to
stagingconfiguration.Test the changes in the
stagingconfiguration.If necessary to fix issues with the changes, save the fixes to the
stagingconfiguration.If necessary to dismiss the changes and restore the old
deployedconfiguration, save the old definition from the backup files to thestagingconfiguration.If the changes are OK or the old definition is restored, move the custom tab definition from
stagingtodeployed.
Managing the custom ribbon tab
You can create, rename, remove, and deploy the custom ribbon tab.
Creating the custom ribbon tab
On installing the Canvas Envision Creator web application, the ribbon of the document page editor and the 3D editor does not include the custom tab.
To create the custom ribbon tab for Creators in the workspace to use it in the document page editor or the 3D editor:
Create at least one custom command button visible in the document page editor or the 3D editor.
If the custom tab should be visible in both editors, create a custom command button for each editor.
Test the custom tab in the
stagingconfiguration.Once testing has been passed, deploy the custom tab.
Renaming the custom ribbon tab
On the first creation of the custom ribbon tab after installing the Canvas Envision Creator web application, the name of the custom ribbon tab is Custom by default.

To rename the custom ribbon tab:
Open the Custom Ribbon Configuration Editor pop-up dialog box.
In the Tab Label field, enter the new name of the custom ribbon tab.
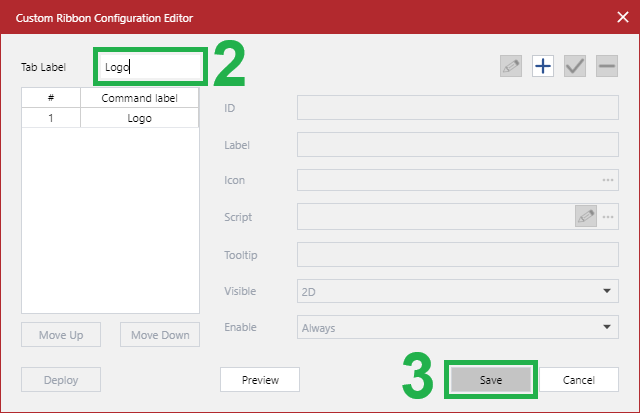
Click the Save button. The Custom Ribbon Configuration Editor dialog disappears.
Go to the ribbon.
Click tab labels on the ribbon or refresh the browser.
Check the look of the new tab name on the ribbon in the
stagingconfiguration.
Once testing has been passed, deploy the custom tab.
Removing the custom ribbon tab
To remove the custom ribbon tab from the document page editor or the 3D editor so that Creators and Admins in the workspace will not be able to use this tab:
Delete all the custom command buttons visible in the document page editor or the 3D editor.
If the custom tab should be removed from both editors, delete all custom command buttons.
Verify that the custom tab is not visible in the
stagingconfiguration.Once the verification has been passed, deploy the custom tab.
Deploying custom ribbon tab
To move the custom ribbon tab definition from the staging configuration to the deployed configuration and let Creators in the workspace view and work with that tab definition:
Ensure that the custom ribbon tab definition in the
stagingconfiguration works as expected, does not break anything, and does not introduce security risks.Open the Custom Ribbon Configuration Editor pop-up dialog box.
Click the Deploy button. The Custom Ribbon Configuration Editor dialog disappears.
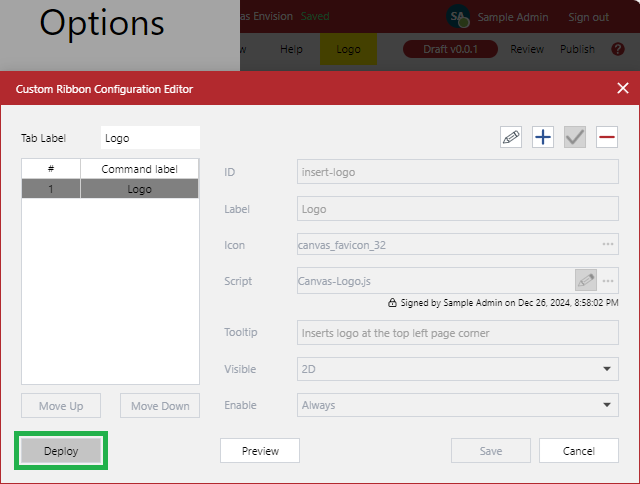
Go to the ribbon.
Click tab labels on the ribbon or refresh the browser.
Check that the
deployedconfiguration has replaced thestagingconfiguration on the ribbon.
Managing custom ribbon tab buttons
You can create, move, update, and delete command buttons on the custom ribbon tab.
Creating custom ribbon tab buttons
To create a new command button on the custom ribbon tab so that Creators and Admins in the workspace will be able to use this new command button:
Open the Custom Ribbon Configuration Editor pop-up dialog box.

Click the Add toolbar button. The Dismiss button replaces it on the toolbar. The fields become active.
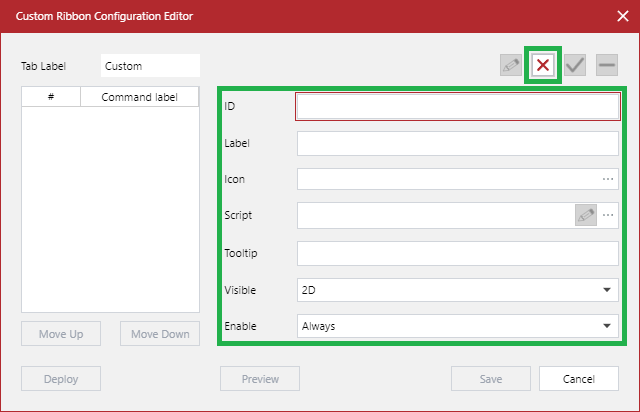
Populate all the fields with valid data for the new command button. The Confirm toolbar button becomes active.
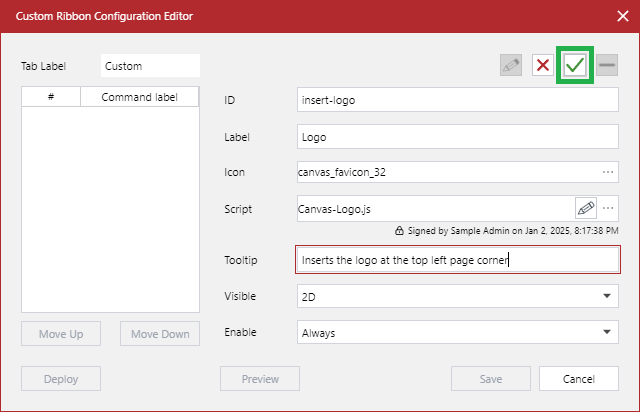
Click the Confirm toolbar button. The new command button appears as the last one on the Commands list. The Save button becomes active.
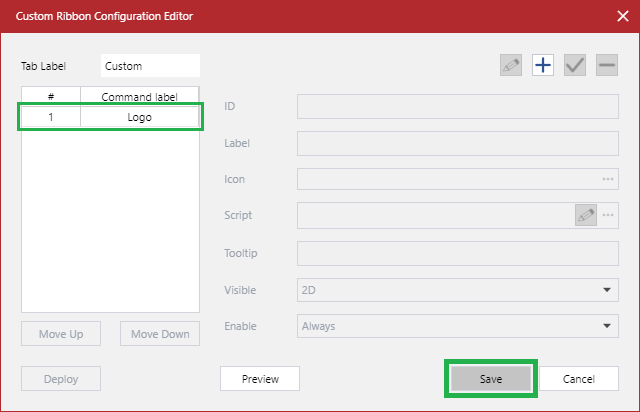
Click the Save button. The Custom Ribbon Configuration Editor dialog disappears.
Go to the ribbon.
Click tab labels on the ribbon or refresh the browser. The newly created command button appears on the custom ribbon tab in the
stagingconfiguration.
Test the new command button on the custom ribbon tab in the
stagingconfiguration.Once testing has been passed, deploy the custom tab.
Moving buttons on the custom ribbon tab
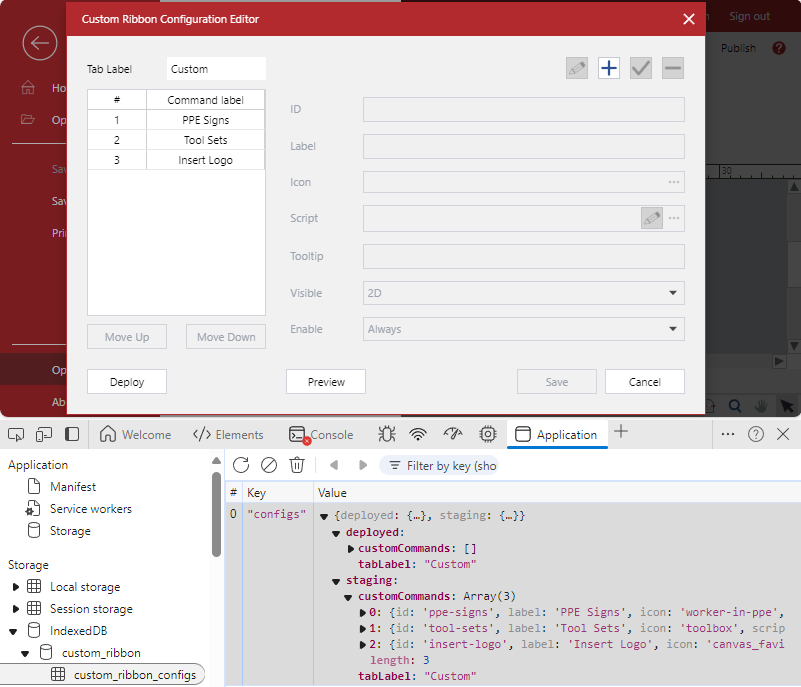
The order of custom command buttons is the following:
From top to bottom on the Commands list.
From left to right on the custom ribbon tab.
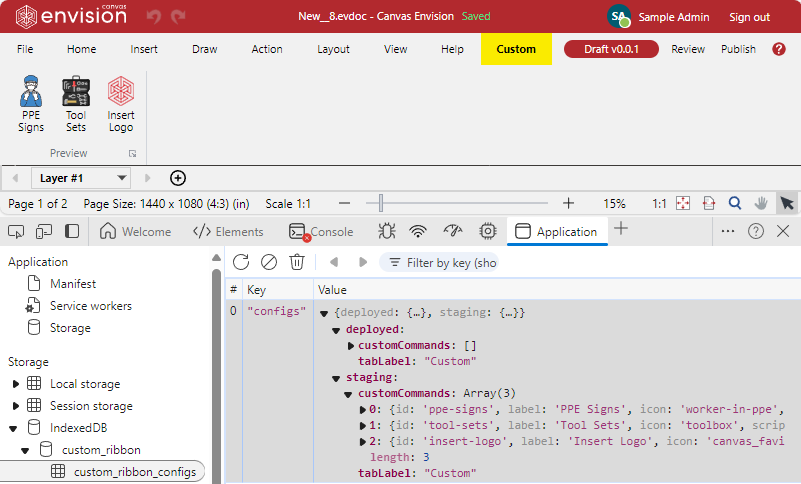
From the start to the end in the array of custom command buttons in the database.
On creating a new custom command button in the Custom Ribbon Configuration Editor pop-up dialog box, it is appended to the Commands list as the last one.
To move a command button on the custom ribbon tab so that Creators and Admins in the workspace will be able to view and use this command button at the new position:
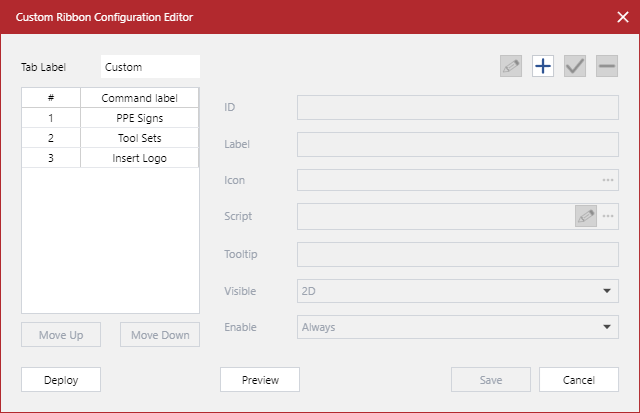
Open the Custom Ribbon Configuration Editor pop-up dialog box. The Commands list includes the command buttons existing on the custom ribbon tab. No command button is selected from this list. The Move Up, Move Down, and Save buttons are inactive.
From the Commands list, select the command button you want to reposition on the custom ribbon tab. The Move Up, Move Down, or both buttons become active if you can move the command button in that direction.
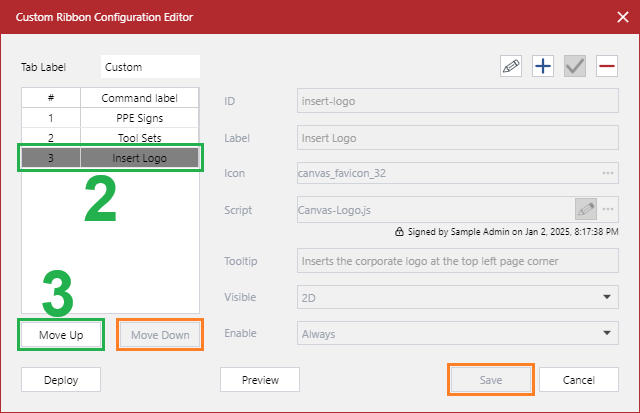
Click once or multiple times:
Move Up: to move the command button to the left on the custom ribbon tab.
Move Down: to move the command button to the right on the custom ribbon tab.
Each of these buttons becomes active or inactive depending on the current position of the command button on the Commands list. The Save button becomes active once the command button has been moved.
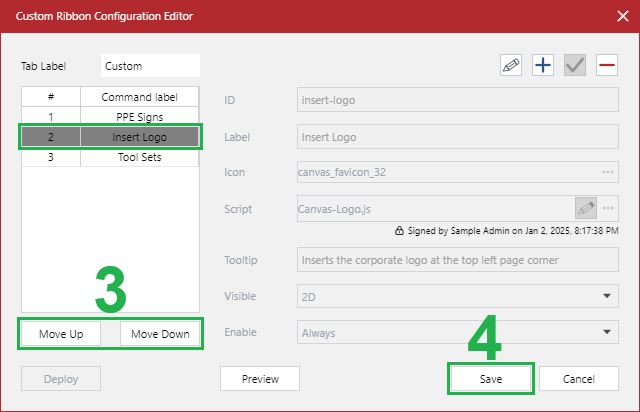
Once you have moved the command button to the necessary position, click the Save button. The Custom Ribbon Configuration Editor dialog disappears.
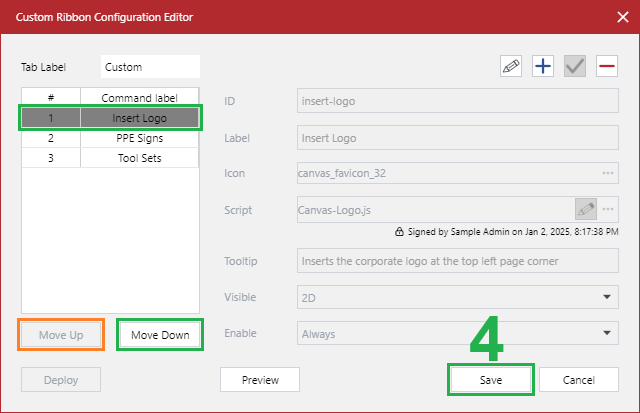
Go to the ribbon.
Click tab labels on the ribbon or refresh the browser. The command button appears at the new position on the custom ribbon tab in the
stagingconfiguration.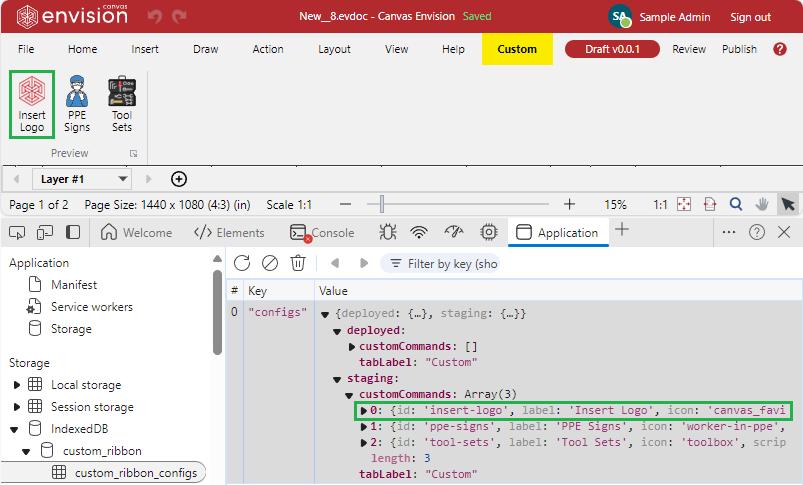
Verify the correct position of the moved command button on the custom ribbon tab in the
stagingconfiguration.Once the verification and testing have been passed, deploy the custom tab.
Updating custom ribbon tab button properties
To update a command button existing on the custom ribbon tab so that Creators and Admins in the workspace will be able to use the updated command button:
Open the Custom Ribbon Configuration Editor pop-up dialog box. The Commands list includes the buttons existing on the custom ribbon tab. No command button is selected from this list. The fields are blank and inactive. The Edit, Confirm, and Save buttons are inactive.
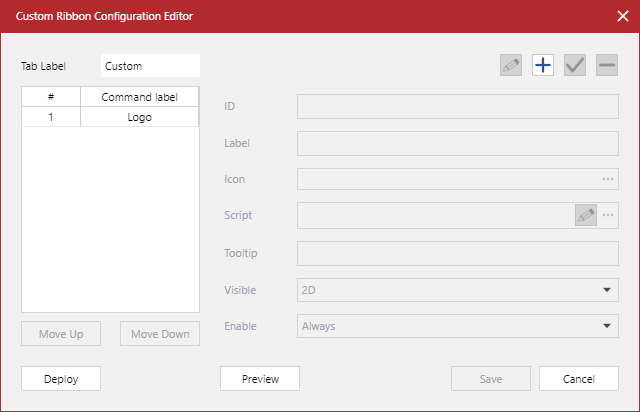
From the Commands list, select the command button you want to update. The fields start displaying the property values for the selected button. The Edit toolbar button becomes active.
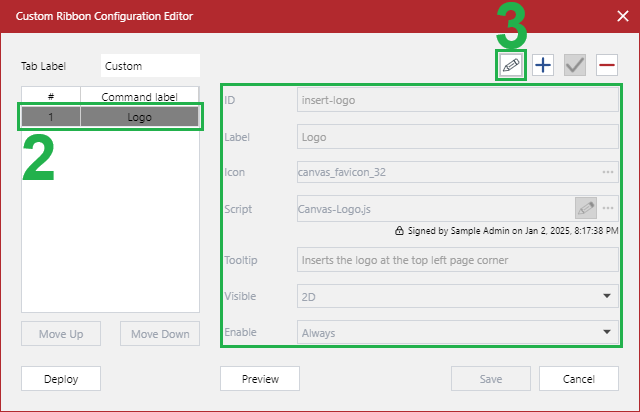
Click the Edit toolbar button. The Reset button replaces it on the toolbar. The fields become active.
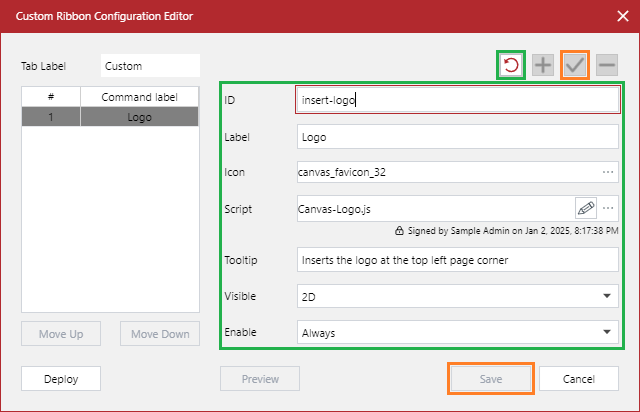
Update the fields with valid data as you need. The Confirm toolbar button becomes active.
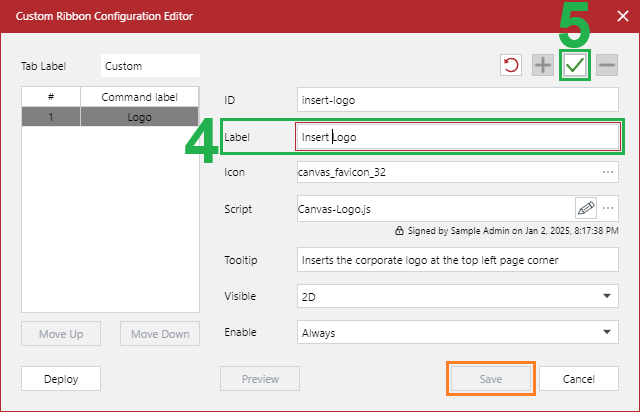
Click the Confirm toolbar button. Your changes to the property values are ready to be saved to the
stagingconfiguration. The Commands list includes the command button with the updates. The Save button becomes active.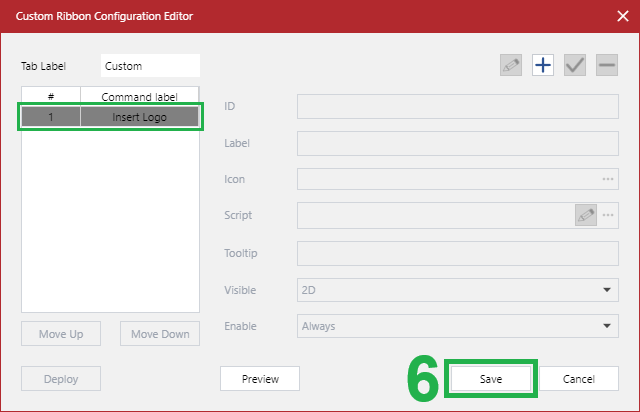
Click the Save button. The Custom Ribbon Configuration Editor dialog disappears.
Go to the ribbon.
Click tab labels on the ribbon or refresh the browser. The updated command button appears on the custom ribbon tab in the
stagingconfiguration.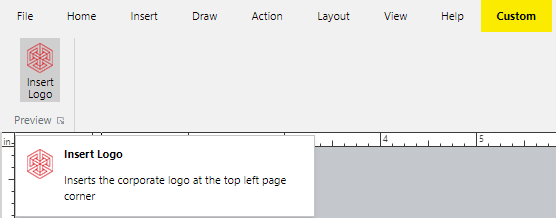
Test the updated command button on the custom ribbon tab in the
stagingconfiguration.Once testing has been passed, deploy the custom tab.
Deleting custom ribbon tab buttons
To delete a command button from the custom ribbon tab so that Creators and Admins in the workspace will not be able to use this command button:
Open the Custom Ribbon Configuration Editor pop-up dialog box. The Commands list includes the buttons existing on the custom ribbon tab. No command button is selected from this list. The Delete and Save buttons are inactive.
From the Commands list, select the command button you want to delete from the custom ribbon. The Delete toolbar button becomes active.
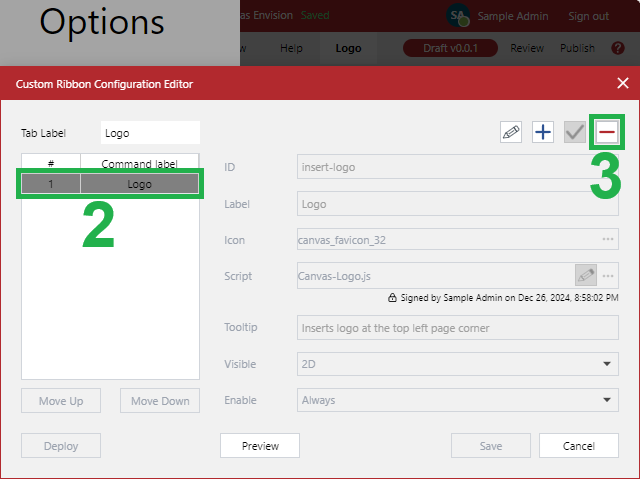
Click the Delete toolbar button. The command button disappears from the Commands list. The Save button becomes active.
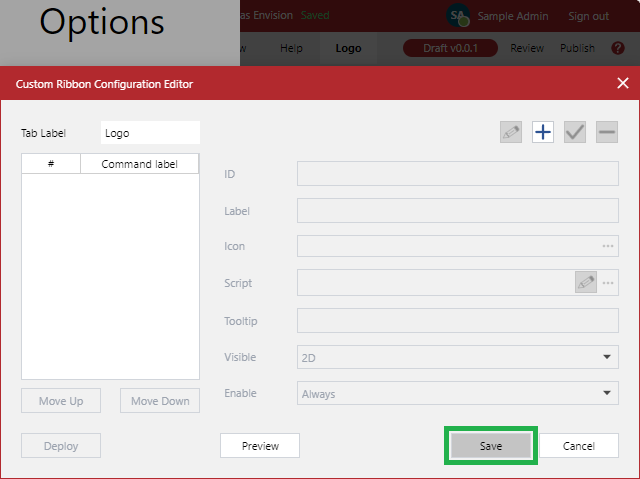
Click the Save button. The Custom Ribbon Configuration Editor dialog disappears.
Go to the ribbon.
Click tab labels on the ribbon or refresh the browser.
Verify that the deleted command button is not visible on the custom ribbon tab in the
stagingconfiguration.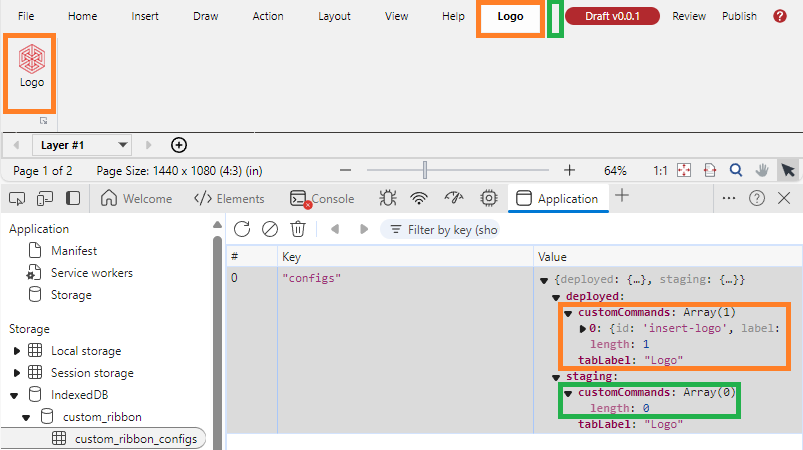
If the deleted command button has been deployed, deploy the custom tab to remove this command button from the
deployedconfiguration.